How to Stop Contact Form Emails From Going Missing
Have you ever had a client inquire about missing emails from website contact forms? For example, they’d been receiving emails at first, but the emails soon became spotty, stopped arriving altogether, or turned up in the spam folder months later. Problems with website contact forms are one of the most common problems developers hear about.
The usual suspect is a missing SMTP connection, guaranteeing issues with contact form emails. It doesn’t matter how many times you whitelist an email or IP – without an SMTP connection, there will be failures.
With WordPress, contact forms are a cinch to set up. Some themes have built-in contact forms such as Divi, or you could download one of many popular contact form plugins such as Contact Form 7, Gravity Forms, or WP Forms.
However, it doesn’t matter how sophisticated these forms are – without an SMTP connection, issues will arise. The contact forms will instead utilize the PHP mail() function, an unsecured mechanism that often leads to emails being classified as spam, sent to spam folders, or filtered out completely by the recipient email host or ISP.
Once a Contact Form Is Set Up, Ensure Deliverability
To set up an SMTP connection, create a new email account. If your client doesn’t have a paid email service and the MX records for the domain have not been altered, use the cPanel email. It’s free!
GoDaddy Tip: If the MX records have been changed, you can still use a cPanel email to serve as your SMTP connection for web forms. Simply use the server’s IP address as the SMTP hostname when you’re ready to connect.
Create a generic email box through the hosting provider within cPanel. Navigate to the email section and create an email such as info@yourwebsite.com or mail@yourwebsite.com. This is the email and host that will be used to send contact form emails (it is not necessarily where your form notifications should be sent).
Make sure to record the password and take a screenshot of the “Connect Devices” screen obtainable through the button next to the new email, or simply keep the tab open to refer to it later.
It is advisable to use the Secure SSL/TLS settings.
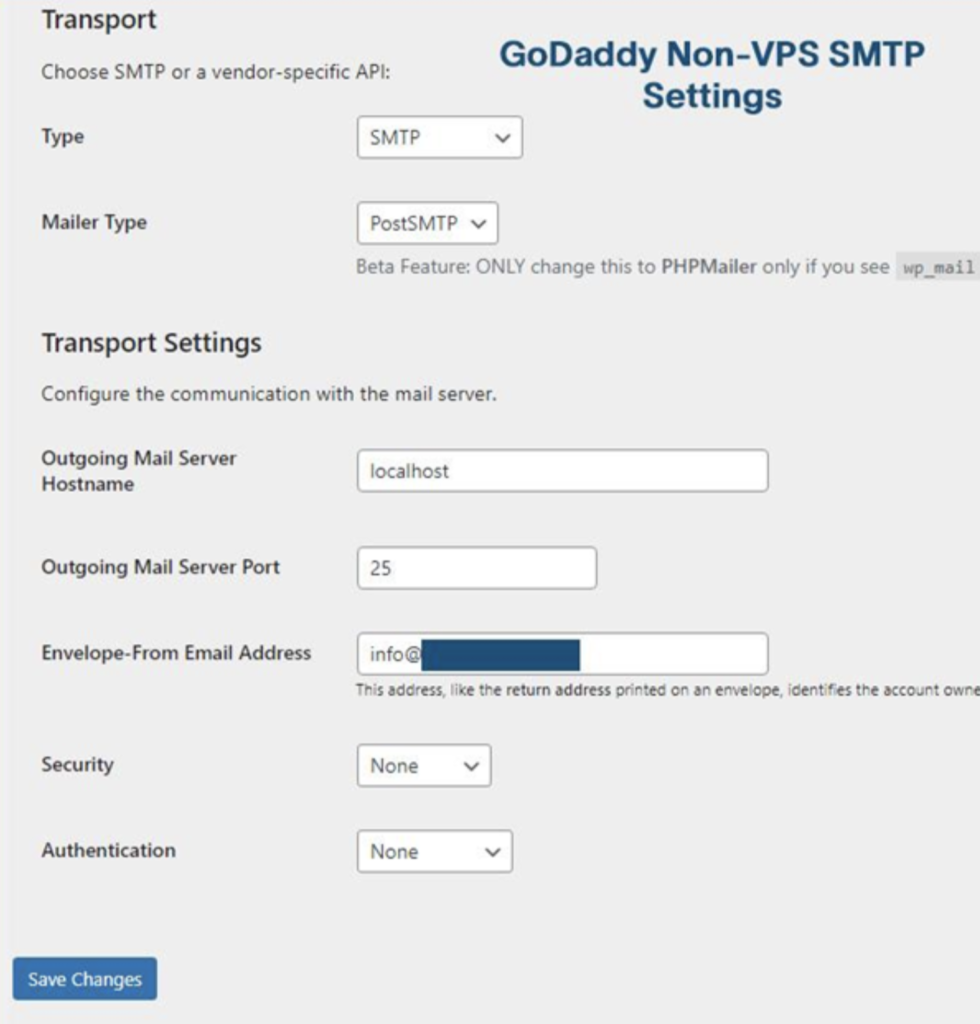
GoDaddy Tip: GoDaddy blocks the secured outgoing SMTP ports on its shared hosting environments. Unless you have a GoDaddy VPS, use the Non-SSL settings. It is also important to note that the displayed hostname might not work but using “localhost” as the hostname often corrects the issue.
Once this is done, go back to the cPanel email section and click on “Email Deliverability”.
In this section, check the domain in question. If there is an issue, click “repair” and cPanel will automatically adjust the DKIM, SPF, and PTR records for that domain.
The DKIM record acts as a handshake between servers. It is a security standard that ensures the email has not been altered during transit and is valid. This is one security record that helps to prevent an email from being shuffled to a spam folder.
An SPF record prevents spammers from sending out emails using your domain. By using an SPF record in combination with a DMARC record, the email is proven verified by recipient ISPs and email hosts.
A PTR is a pointer record that allows for a reverse DNS lookup. This is yet another factor used in verifying emails.
GoDaddy Tip: GoDaddy does not include the Email Deliverability option in its cPanel for non-VPS users. The DNS records will need to be adjusted manually which is discussed below.
Connect Your Forms to Your SMTP Server
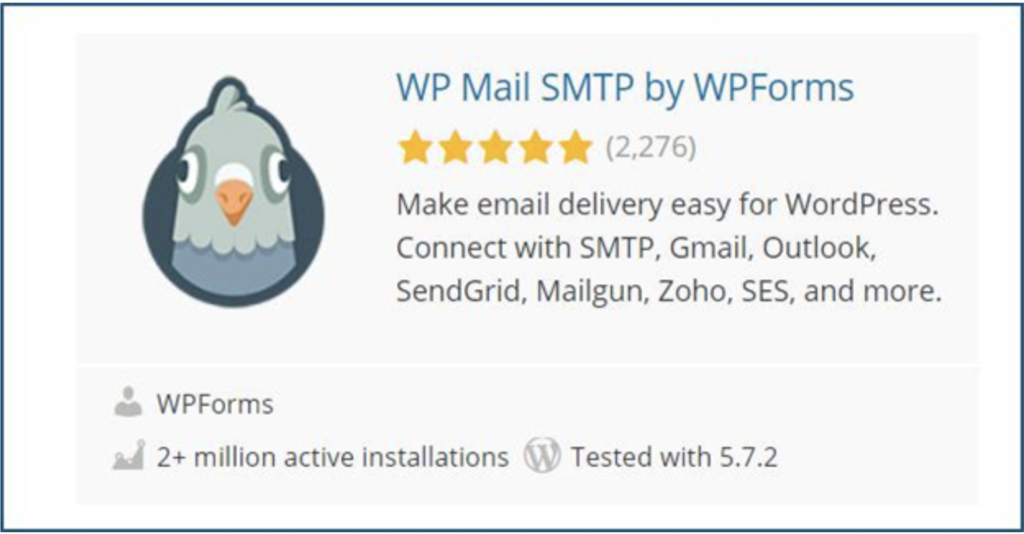
Once the email is created, go to the WordPress dashboard of your site and install the WP Mail SMTP by WPForms plugin and activate it. This will force your contact forms, administrative email, and other plugins that utilize the mail function to use your server’s SMTP connection.
With some plugins and contact forms, you can enter the SMTP credentials within the settings of these plugins. However, WP Mail SMTP will give you the tools to make DNS entries, ensuring better results. It also affects all plugins using the mail function which helps to simplify the process (with only one place to enter the information) and ensure uniformity.
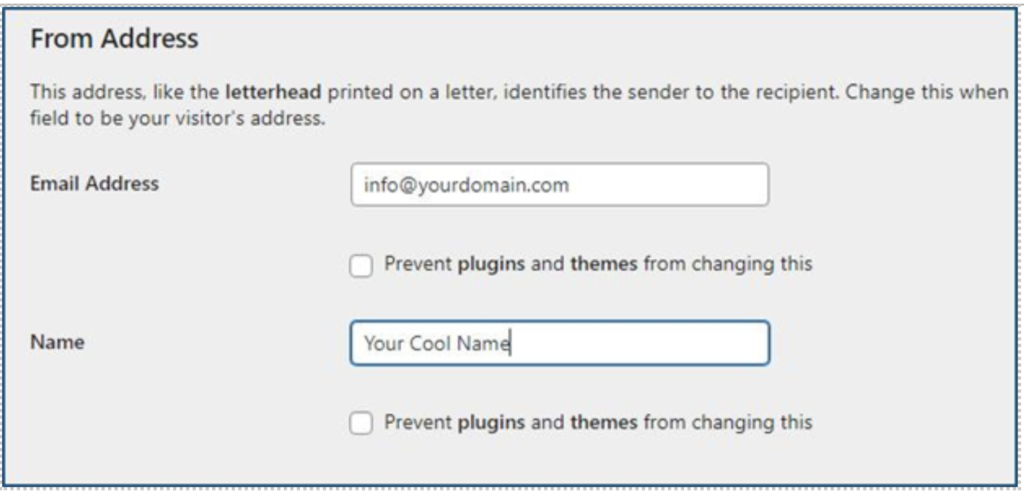
Using the manual setup within the WP Mail SMTP settings, set the “From Email” to the email you just created. The “From Name” can be any name you desire.
You can choose to force the “From Name” and “From Email” or not by using the checkboxes provided. This should not affect deliverability. Since you’re only using this new email account as the SMTP server, feel free to leave these boxes empty. This way, when a user fills out the form, it will appear as if the email is coming directly from the user. However, if you’re also sending a second notification to the sender, you may want to force these settings. When the connection is completed, play around with these settings while testing the form and received emails.
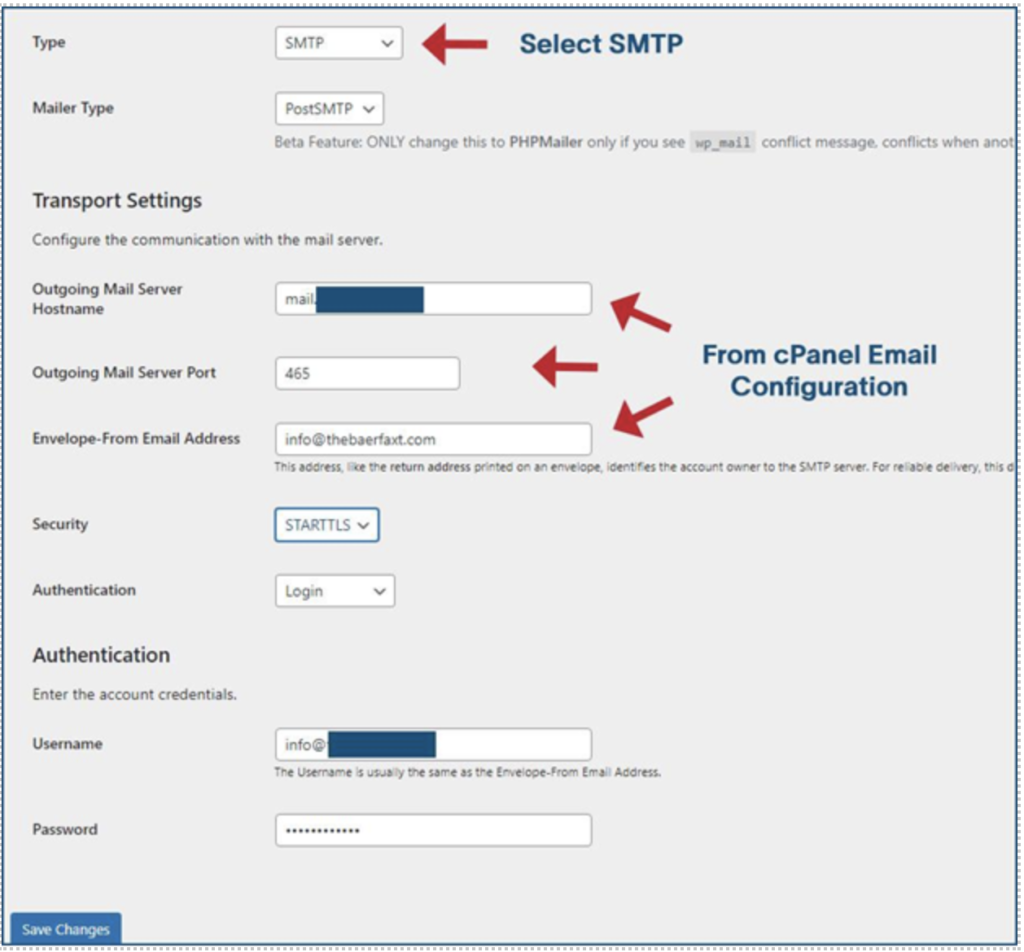
If you’re using cPanel email, select “Other SMTP” in the settings.
This is where to add the SMTP settings from the information recorded when you created the email account.
Enter the “SMTP Host” under the appropriate field. Under encryption, choose SSL if the SMTP port is 465 or TLS if the SMTP port is 587. This may vary across hosting platforms – refer to the “Connect Devices” screen for the email setup.
Turn on Auto TLS if “Secured SSL/TLS” has been selected and turn on Authentication in either case. Add the username and password in the fields provided. Then save the settings.
GoDaddy Tip: Remember to use the Non-SSL settings if you’re on a non-VPS GoDaddy hosting account. But do not let this alarm you. Your contact form emails will still come through perfectly with the addition of DNS records (below). Use “localhost” as the outgoing mail server hostname and choose “None” for encryption.
Scroll upward, select “Email Test”, and send an email to yourself using a different email than the one you created. If the email does not go through, check and double-check your settings. When the test email is successfully sent, “Domain Check Results” might appear at the bottom if there are issues. This is important to address for email deliverability.
If your cPanel email had the “Email Deliverability” option discussed above, your SPF record should show a green checkmark. If there is an issue, there will be a link provided explaining how to add the record to your DNS settings.
GoDaddyTip: There can be only one SPF record, making it necessary to delete an existing one or merge them. Otherwise, it will not pass the checks.
As for DMARC, you likely have the recommended action of adding a _dmarc TXT record to your DNS settings. A link will be provided with the steps to accomplish this.
GoDaddy Tip: Most likely, there will be issues with SPF, DMARC, and DKIM records. Links will be provided that detail how to add these records to your DNS. Note that only one SPF record can exist.
Once the test email goes through without any warnings, your SMTP connection is valid and good to go!
Secondary Notifications
Your web form is designed to send the form contents to you. But sometimes, you may want the sender to also receive a “secondary notification” email letting them know that their message has been received. In this case, it is important to know how the recipient may interact with this email. If they reply to this email, where will it go?
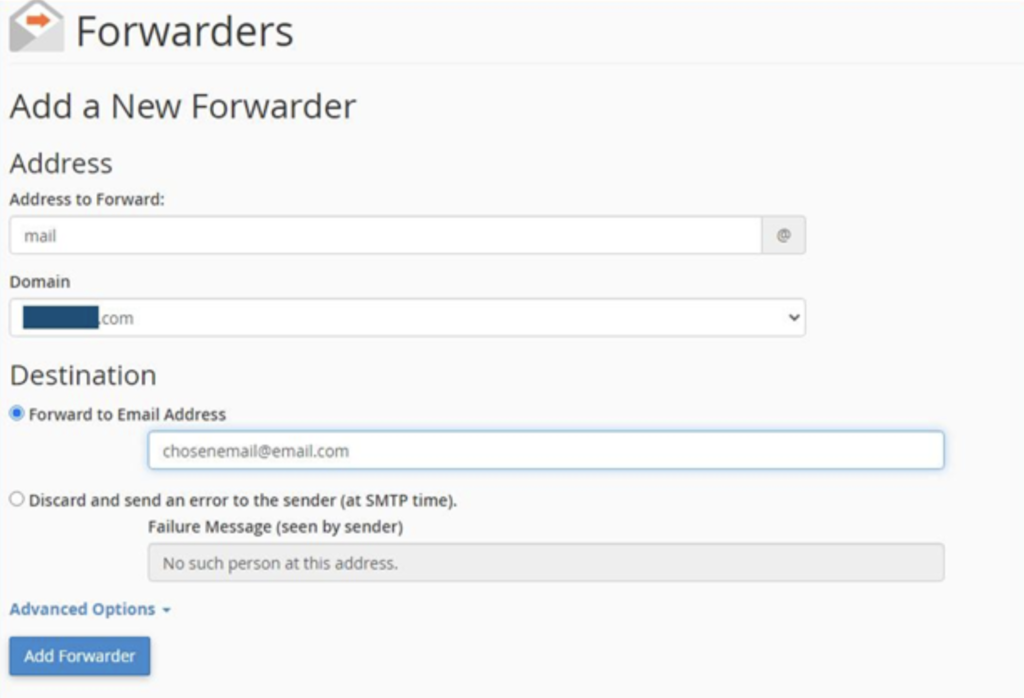
First, make sure that the email box you set up in cPanel is either being accessed by a user or has incoming messages forwarded to the client’s chosen email account. Set up a forwarder in cPanel.
Under “Create an Email Account Forwarder”, select “Add Forwarder”.
Select the email address and domain and insert the chosen email where any email should be forwarded to.
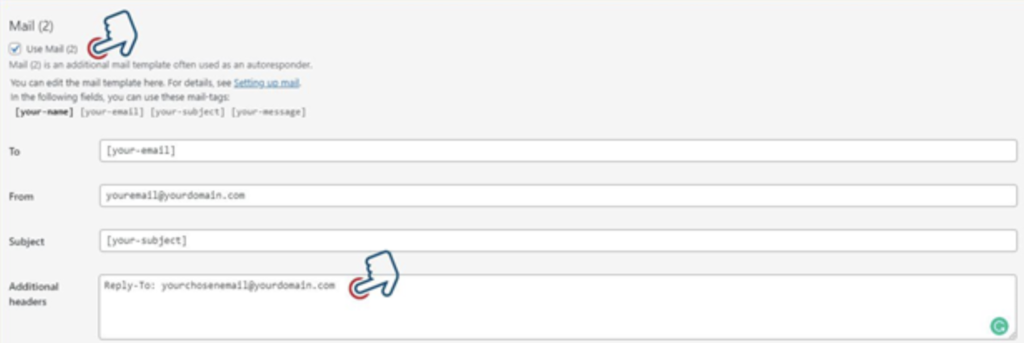
Another option to be used in conjunction with this is to set the “reply-to” field for these secondary notifications. Be aware that not every contact form plugin or module will contain this feature.
Contact Form 7 has the ability to send secondary notifications using specified information. In each form settings, under the mail tab, there is a checkbox at the very bottom next to Use Mail (2). Checking this box will open up a new email for your secondary notification. Here, you can set a reply-to email.
Give the Boot to the Bots
Functional forms need to be protected from spambots. To do this, install Google reCAPTCHA.
Navigate to Google reCAPTCHA and click on the “Admin Console” at the top. Add a new site by clicking the plus icon at the top then give it a name, add the URL, and decide if you want to use version two or three. Version three in an invisible honeypot which is proving to be more effective than version two. A honeypot is an invisible field that only a spambot can see. If the spammer fills this field out, the form can be confidently rejected as spam. Another bonus to the invisibility factor is that it removes the need for users to take the additional step of a captcha test.
After setting up the new site, you will receive a site key and a secret key.
Where to insert these keys depends on the contact forms being used as well as the CAPTCHA version.
Contact Form 7
Navigate to “Contact” > “Integration” in the WordPress dashboard. Under the reCAPTCHA heading, click the button to “Setup Integration”. Add the keys provided. If you chose version 3, no other settings are required and your individual forms get reCaptcha enabled automatically. If you chose version 2, you must manually add the reCAPTCHA field on each form.
Gravity Forms
- reCAPTCHA Version 2: Navigate to “Forms” > “Settings” > “reCAPTCHA” and simply enter your site and secret keys, making sure to select the same type of validation method you selected in the Google reCaptcha admin panel (checkbox or invisible).
For each form, you will need to add the CAPTCHA field. On the form setup page, select the “CAPTCHA” field under the “Advanced Fields” heading to place the field.
- reCAPTCHA Version 3: Navigate to “Forms” > “Add-Ons”, search for the reCAPTCHA Add-on, then install it. Once installed, the Version 3 option will be available under “Forms” > “Settings” > “reCAPTCHA” where you can enter your keys. With this option, each form gets its own reCAPTCHA setting which is enabled by default.
WP Forms
Navigate to “WPForms” > “Settings” and click CAPTCHA at the top. Choose the correct type of CAPTCHA and enter your site and secret keys. Once saved, there will be a reCAPTCHA option under the “Standard Fields” heading in each form.
Exclude the Contact Page from the Cache
Sometimes CAPTCHA and caching don’t get along. It’s best to exclude the contact page from your cache. If the site uses a caching plugin, add a rule to exclude this page in the plugin’s settings. The same goes for a server cache. Don’t forget to clear the cache after setting this new rule.
For example, in WP Fastest Cache, a WordPress plugin, the settings include an “Exclude” section where you can exclude a page from the cache by setting the “Request_URI” to “Is Equal To” and enter the URL for the page in question. Delete the cache after setting any new rule.
Blacklisted Relays
Shared hosting environments and some dedicated servers use shared relay systems that rotate on availability. When someone abuses the system, it causes the shared server relays to be blacklisted. This affects other users on the same platform. A blacklisted relay gets removed from the rotation and repaired, but this takes time. If this occurs to a relay your server is using, your emails may be temporarily affected.
At Media Temple, the account responsible for spamming will receive a warning on the first offense. A second offense will lead to appropriate actions from our email operations team.
Summary
Though they seem it, plugin forms are not truly “plug and play”. There’s a fair amount of work involved to ensure contact form emails are reaching their destination. Remember to test your contact forms often and remind your clients to do the same.


