Linux Administration For Web Developers: Part 1
Developers working in the IT industry today often have clearly defined roles and responsibilities. However, circumstances sometimes require them to step outside of their job descriptions and, for example, deal with Linux servers—a task which is usually handled by a DevOps team or a system administrator within a company. While this might be a rare occurrence in larger enterprises, in smaller startups, knowing Linux basics can be really helpful. For the ambitious, having this skill can even lead to a higher salary.
This two-part article will introduce you to Linux, focusing on the commands and procedures that web developers and others working in similar roles are most likely to use.
Working With Linux: 101 for Web Developers
Working with Linux can seem daunting at first, especially for those who are mostly familiar with the Windows operating system. Most Linux servers you encounter won’t have a graphical user interface (GUI), so you will have to rely solely on the command line interface (CLI) to handle things. Luckily, learning Linux basics is not that hard, and with a minimal time investment, you should be able to take care of tasks like copying files, installing packages, and processing logs.
What Is Linux?
Linux is a Unix-like operating system created by Linus Torvalds and initially released back in 1991. Linux is open-source, and it is packaged as one of many different distributions (such as Red Hat, Ubuntu, and Fedora) currently available. These modern distributions are testaments to the collaboration of the many engineers who worked on the source code, both commercially and non-commercially.
The Linux operating system can be found running on the majority of enterprise servers around the world today as well as on most phones. Its widespread use makes the ability to work with Linux a sought-after skill, especially in the DevOps ecosystem.
Familiarizing Yourself with the Command Line Interface
The first thing you have to learn is how to get around within Linux. Let’s cover some of the commands you will need to do that.
Listing Content Using “ls”
The “ls” command allows you to list the content of directories. Using various options (also called flags), you can access a lot of information about the files within the directories.
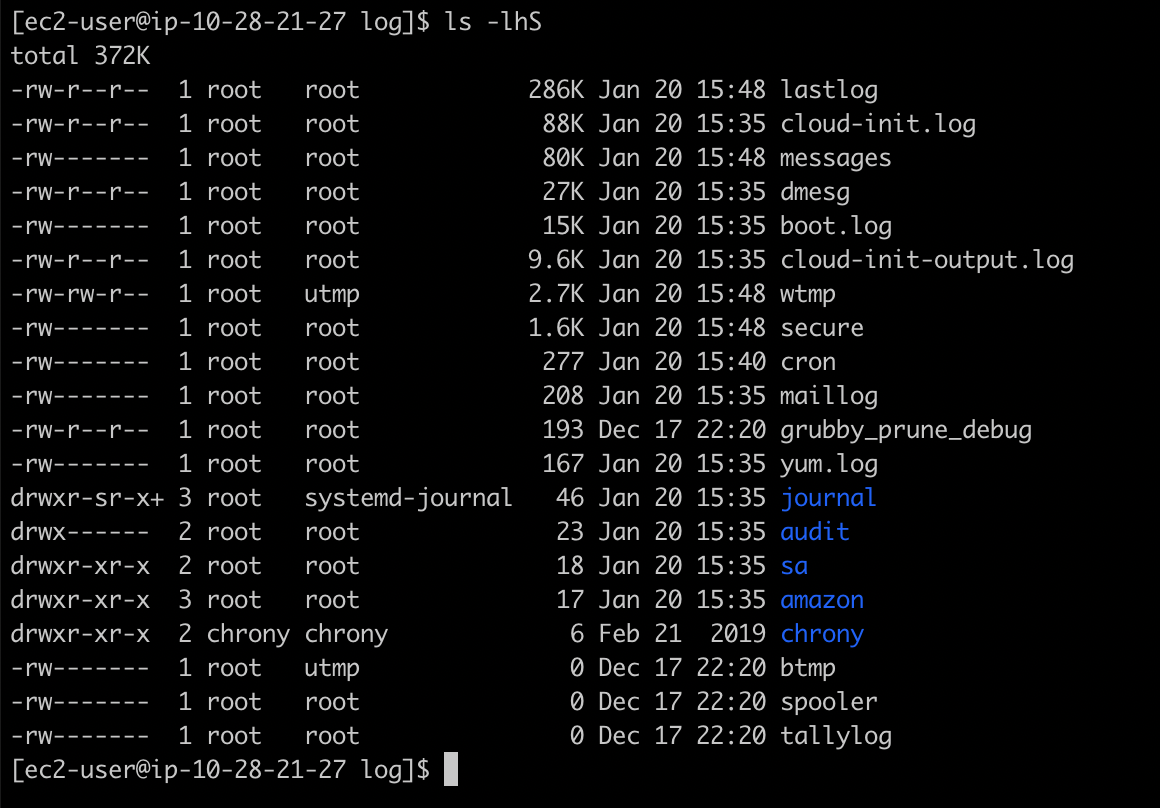
“ls -l” will return a list of files in long format, showing you file permissions and ownership as well as the file size and a timestamp. This option is used most frequently, and it is often used with other commands, such as “-a” which shows hidden files and directories (most commonly .ssh, .git, etc), “-t” which sorts files by timestamp, “-S” which sorts files by size, and “-h” which makes the file sizes human-readable (shown in bytes, kilobytes, megabytes, etc).
You can combine flags within the same “ls” command, as shown in the screenshot below.
Making and Changing Directories: Copying and Deleting Files and Directories
When you use the CLI, you will need to move between various directories. To do so, use the “cd” command along with the directory name you want to move to. Keep in mind that the directory path you choose can be relative or absolute. A relative path refers to the location compared to the current working directory, while an absolute path looks at the path from the root directory (the “/” dir). To create a new directory, use the “mkdir” command followed by the name you want to apply to the new directory.
Copying files and directories is done using the “cp” command followed by the source you want copied (a file or a directory) and the destination where you want to copy the source to. The most important flag to note here is “-r”, which stands for recursive. It is used to copy the directories as well as anything inside them (such as subdirectories).
To remove a file, use the “rm” command and the name of the file. To remove a directory, use “rm -r” and the name of the directory.
Another very useful CLI feature is tab completion. It allows you to auto-complete a file (or even a command) by simply pressing the tab key. For example, if you type “les” and press the tab key, the “less” command will be auto-completed. Similarly, If you are trying to open a file which has a long name, you can type the first few characters of that name and press tab to avoid having to type the whole thing. If tab completion finds multiple options for a file or command, it will suggest them all. This can be useful if you are unsure whether or not a command or file exists.
Working with Linux Files (Using vi, chmod/chown, cat, less, head/tail, grep, and awk)
Now that you can handle files and directories, let’s look at how to work with files, a big part of everyday Linux tasks.
Creating and Editing Files Using “vi” and “vim”
Vi is the most well known text editor, and it is part of every Linux distribution you will run into. This editor is somewhat difficult to work with at first, since it is not very intuitive, but the various in-depth guides that exist can help you get a grip on this tool.
To open the editor, simply use the “vi” command. Alternatively, you can use the command “vi fileName” which will allow you to directly save the changes made into the desired file.
Vi IMproved, or “Vim” offers various features like syntax highlighting, unlimited undo, and GUI support. Vim has been ported to many operating systems, and, in some cases, running a “vi” command will actually open the Vim editor. Vim also provides an interactive help mode which allows you to get through the basics of the editor. You can run it using the “vimtutor” command.
Reading Data with “cat” and “less”
The “cat” command (an abbreviation of “concatenate”) is used for reading the content of files within Linux. For most basic use cases, you can use “cat file”. You can also concatenate and read multiple files using commands like “cat file1 file2”. The most commonly used flag is “-n”. It shows you line numbers, which can be useful when working with large content.
Just like “cat”, “less” allows you to read the file content; however, “less” displays (and accesses) content one page at a time. If you are looking at very large files such as logs, you can access content faster, move up and down a page, and even search within the file for a specific word using this command.
Parsing Content with “head” and “tail”
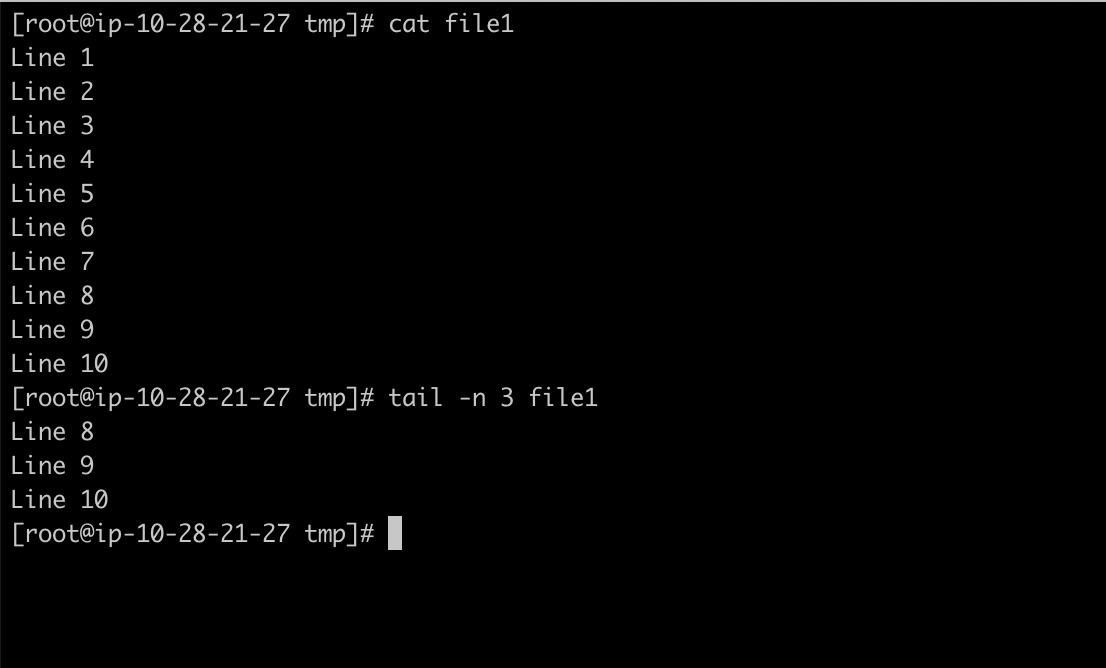
You will often need to parse large content, such as log files, and you are likely to find yourself needing to look at only the first or the last few lines of the content. The “head” command will show you the top X lines of the data (with the default being 10 lines), and you can write it as “head -n X file”.
Similarly, the “tail” command will show you the bottom X lines (again, the default is 10), and it is written as “tail -n X file”. The “tail” has a very useful flag, “-f” (the “f” stands for “follow”), which will not only output the content, it will also continue to show extra lines as they are added. This is useful for monitoring updates to the files as they happen or for seeing the effects of your configuration changes by looking at the live updates of the logs.
Searching Lines Using “grep”
The commonly used “grep” command is useful when you need to search the lines of the output or search a text. If you need to find a specific line in the logs or in the configuration file, for example, you can use the command “grep word file”.
There are some very useful flags that can be used here, such as “-i” which makes the search case insensitive (helpful when you don’t want to bother with capital letters) and “-R” which is used for a recursive search within a directory and all of its subdirectories. You can use “-aX” to get the lines after the one you have been searching for. For example, “grep -a2 Tags file” will show you all the lines in the searched file that contain “Tags” along with the two lines after them.
Changing File Permissions and Ownership with “chmod” and “chown”
Permissions and ownership of files are very important when working with Linux, so you will need to know how to make changes to them. The “chmod” command allows you to modify permissions. Its most basic use case is “chmod +x file”, a command which will add the execute permissions to a file. With this command, you can, for example, make your newly created bash script executable.
The “chown” command gives you the ability to change the ownership of the files. When working with Linux, you need to distinguish among the permissions that the owner of the file has, the permissions that the group has, and the permissions that everyone else (also known as “other”) has. To change the ownership of a file to a user named ec2-user and the group ec2-user, use “chown ec2-user:ec2-user file1”.
Working with Packages
When working with Linux, you will have to know how to work with packages in order to be able to install, update, and remove them or add a new repository. A different package management tool will be needed depending on the distribution being used. The two most commonly used tools are YUM (for RedHat, Centos, etc.), and APT (for Ubuntu, Debian, etc).
Working with YUM
YUM (which stands for “Yellowdog Updater Modified”) is very simple to use. To install a new package, use the “yum install package” command. Similarly, removing the package is done by issuing the “yum remove package” command and updating with “yum update package”. If you want to update your system, “yum update” is the command to implement. Be careful not to update the system by mistake!
You can list all available packages with “yum list”, or you can use “yum list installed” to see only the packages you already have on your system.
Working with APT
APT (Advanced Package Tool) is very similar to YUM. To install a package, use “apt-get install package”. To remove it, use “apt-get remove package”. Because APT preserves the configuration of the package, to completely remove both the package and its configuration, you will need to use “apt-get purge package”. Updating packages is handled with “apt-get –only-upgrade install Package”—a bit confusing when compared with the YUM process.
Before installing software with APT, it might be a good idea to update your repositories. You can do this with “apt-get update”.
Summary
In this first part of a two-part article, we have covered some basic commands needed to manage the Linux operating system. We’ve explained how to get around the Linux directory structure and how to work with files and packages, focusing on the tools that are used on a daily basis.
In Part 2 of the article, we will cover Linux processes as well as how you can deploy your own Apache web server, interact with it, and maintain it.


